Associa_logo_289_137

Conductor Digital Instructions

Training Rooms 108 & 109

RP021131

Microsoft Teams Overview

Barco User Guide

Room Overview

Each room includes:

  • Camera: Cisco PTZ camera at the back of the room.

  • Control: Cisco Teams Room touch panel (see Picture 2).

  • Display: Large front display.

  • Confidence Monitor: Cart connection at the back (mirrors the main display – see Picture 4).

Content sources you can use:

  • Wallplate under the touch panel (USB-C and HDMI – see Picture 2).

  • Barco ClickShare.

  • Room PC (controlled with the Logitech wireless keyboard and mouse).

Audio setup:

  • Wireless microphone and podium mic (XLR) for local sound and sending audio to remote participants (see Picture 3).

  • Six ceiling microphones for capturing voices to send to the far-end during calls.

Divisible Conference Room

  • The room can be used as two separate spaces or one large combined space.

  • Room 109 is the primary room. When combined, all control is managed from the Room 109 touch panel.

  • When combined, all microphones, speakers, and displays are shared across both rooms.

  • When combined, Room 108’s cameras, content sources, and touch panel are not available.

Microsoft Teams Guide

Use the Room (Join, Meet, Call, Share)

  • Wake the room: Tap the touch panel to bring up the home screen (Join, Meet, Call, Share, Join with ID, QR code).

  • Join a scheduled meeting: If the room was invited, tap Join next to the meeting.

  • Join with Meeting ID: Tap Join with ID, enter the 12-digit Meeting ID and passcode from the invite, then Join.

  • Use the QR code: Point your phone camera at the big on-screen QR. Follow the prompt to Join, Start, or Cast. If you don’t have Teams, it’ll tell you what to install. The code refreshes often—just rescan if needed.

  • Start an ad-hoc meeting: Tap Meet, search names or numbers, then Start.

  • Place a phone call (if enabled): Tap Call, use the dial pad, and place the call. You can also dial someone into an active meeting.

  • Share content: Tap Share and choose:

    • Wireless: Cast from Teams or scan the room’s QR and pick Cast/Share.

    • Wired: Plug into the Room PC or the front Wallplate (USB-C/HDMI). Labels may differ by room—pick the one that matches your cable.

  • Join from your own device without echo: If you also join from your laptop/phone, choose Don’t use audio or Room audio and keep your device muted unless you truly need it.

Controls & Camera (Layout, Presets, Webex)

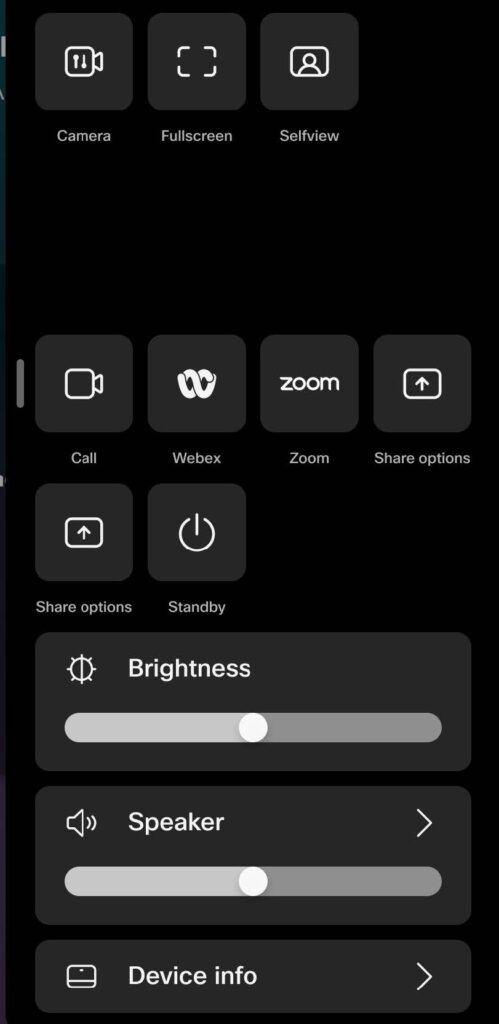
  • In-meeting controls (bottom bar): Camera on/off, Mute, Share, Participants, Raise hand, Reactions, Volume, End call. You can also change Layout and show/hide Chat.

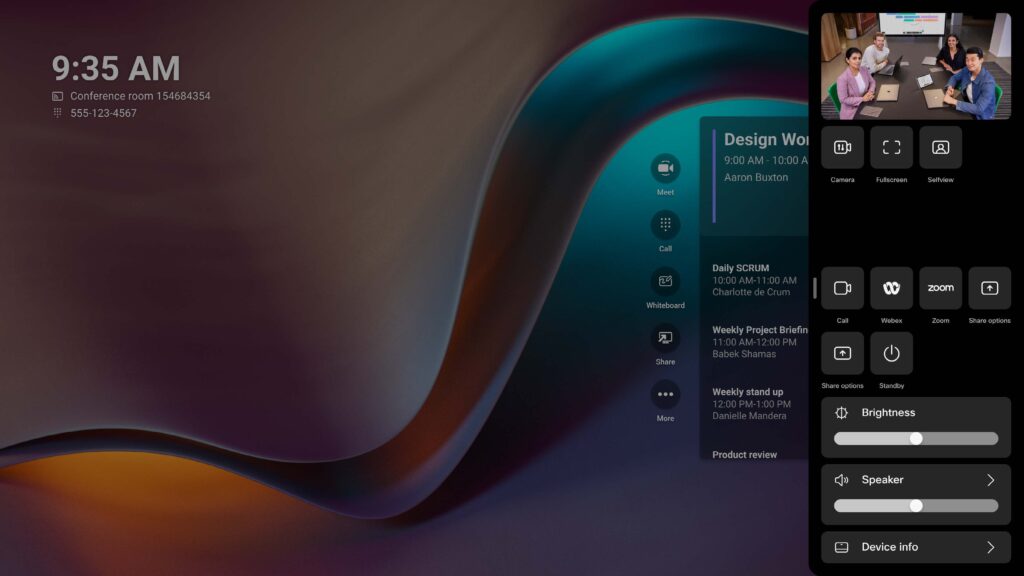
  • Open the Control Panel: Swipe in from the right edge of the touch panel.

  • Camera framing: In the Control Panel, set Manual, then pan/tilt/zoom to frame the table. Save a preset so you can snap back to it later.

  • Self-view: Toggle to see what the far end sees. Drag the window or make it Fullscreen to check framing.

  • Webex (if allowed): From the right-side Control Panel, choose Webex, enter the meeting number (or pick a Personal Room), then Join (uses Microsoft’s Direct Guest Join).

Swipe from the Right – Control Panel Access

To customize your Microsoft Teams Room experience on a Cisco device, simply swipe from the right edge of the screen.

This brings up the Control Panel, giving you quick access to key settings and tools — whether you’re in a meeting or not.

  • Available on: Cisco Desk, Board, and Room Navigator devices

  • Works during and outside of active meetings

  • Helps you manage video, audio, content sharing, and more with ease

Camera

Manually control camera positioning or switch camera modes to fit your meeting needs.

Selfview

Turn your selfview on or off during a call. It always appears at the top of the panel when the camera is active.

Background

Choose a virtual background (primarily supported on Desk devices) for a more professional look.

Fullscreen

Enlarge your selfview to full screen. To exit, swipe right and tap Fullscreen again.

Share Options

Select which device or content source you want to share from. Works both during and outside of a call.

Call

Place SIP-based calls directly from the room system when using Microsoft Teams Rooms mode.

Microphone

Enable noise removal or optimize your mic for better voice pickup.

Webex

Join a Webex meeting using Cisco devices without leaving Teams Room mode.

Zoom

Launch and join Zoom meetings directly from the control panel.

Standby

Put the device into standby mode when not in use to save power and protect privacy.

Auto Brightness

Adjust screen brightness manually or let the system automatically optimize it.

Speakers

Change the speaker volume. This can also be managed through the “More” button on the home screen.

Device Info

Access network settings, diagnostics, Bluetooth, time zone, language, and Teams admin settings (password protected).

Barco User Guide

Display Power

Use the TV IR remote to turn the displays on or off.

Button Overview

The ClickShare Conferencing Button is a small USB-C device used to quickly connect to the room system. Once paired with the Base Unit, it lets you share your laptop screen to the meeting room display and access conferencing features.

  • Share Button (center): A short press will start sharing your laptop screen to the display. A long press will take over the display if others are already sharing.

  • Menu Button: Opens or hides the ClickShare App, giving you quick access to extra features.

  • LED Ring: The light around the share button shows the status:

    • White (steady): Ready to use.

    • White (filling): Setting up connection.

    • Red (steady): Actively sharing.

    • Purple/Red (spinning): Conference view with sharing.

    • White or Red (blinking): Error or connection issue.

The Button is designed to make screen sharing simple and give clear visual feedback so you always know what’s happening.

⚠️ Tip: If the Button keeps blinking and never turns white, unplug it and try again.

1 Share button
2 ClickShare menu button
3 USB-C™ connector
4 Strap holes

Base Unit Overview

At the heart of the system is the Base Unit, which connects the Buttons to the meeting room display and any room peripherals (microphones, speakers, cameras, soundbars). When a Button or the app connects, the Base Unit receives the content and sends it to the display.

The Base Unit has a status LED ring that shows its condition:

  • Static white: Awake and ready to use.

  • Static red: Streaming content to the display.

  • Blinking white: Starting up, pairing in progress, or software update.

  • Breathing white: ECO standby mode.

  • Blinking red: An error has occurred.

A single standby button on top of the unit powers the system on or off. If it’s in standby, press the button briefly to start it up. If it’s on, pressing the button puts it back into standby

Connecting to a ClickShare

ClickShare offers several ways to connect your device to the meeting room:

  • Button: Plug the Button into your laptop to connect wirelessly.

  • ClickShare App (desktop or mobile): Connect directly through the app.

  • Button + App (recommended): Combine both for the smoothest experience and full conferencing features.

  • Wired Roomdock: A fallback option using a physical video cable.

Each method establishes a link between your device and the Base Unit, enabling you to share content and use room peripherals. Depending on the method chosen, external internet access may be limited during use.


Connection with a Button

  1. Plug the Button into a USB port on your laptop. Use a USB-C port directly or a dongle if needed.

  2. Wait until the LED ring fills and then turns steady white. This means the Button has successfully connected to the Base Unit.

  3. If your computer does not allow autorun, you may need to open the ClickShare app manually from the Button drive.

  4. Once connected, press the share button to send your screen to the room display.

The Button cannot connect to mobile devices, so it should always be used with a laptop or desktop computer.

Connecting to a ClickShare App

Ways to connect: Button, ClickShare App, Button + Desktop App (recommended), PresentSense, or Wired roomdock.

    • Network note: Depending on method, internet access can be restricted while connected.

    • Using the ClickShare App (desktop or mobile):

      1. Open the app. (On mobile, first join the Base Unit’s Wi-Fi.)

      2. Pick the room from Nearby Rooms or search by name/IP.

      3. Enter the passcode shown on the room display.

      4. The sharing window opens. (Tip: Use “Try Again/Show Passcode Again” if it disappears.)

    • Peripherals at a glance: When room peripherals (mic/cam/speakerphone) are active, their icons turn green on the wallpaper.

Audio settings (read this before your first call):

      • When you plug in a Button, Windows should set ClickShare Speaker = Default device and Room Speakerphone = Default communications device.

      • Content audio plays through Speakers (lip-synced, higher latency).

      • Conference audio (mics/speakerphone) uses the communications device for lowest latency.

      • If sound comes from the laptop instead of the room: in Windows, pick ClickShare Speaker or set it as Default device; set Speakerphone as Default communications device.

ClickShare App Install

Desktop App Installation:

  • Download the app from the Barco website.

  • Run the installer and follow the steps.

  • When the app opens, click “OK, got it” to begin using it.

You can download the ClickShare app here: https://www.barco.com/en/product/clickshare-app

Mobile App Installation:

  • Download the app from your mobile app store.

  • Open the app and grant permissions when prompted.

  • Choose whether to connect immediately to a meeting room (Yes, I am in a ClickShare room) or browse the app first (No, show me the app).

The desktop app unlocks conferencing and other advanced features, while the mobile app allows simple wireless sharing from a smartphone or tablet.

Screen Sharing

ClickShare allows several ways to share content:

  • Button Sharing: Press the share button on the connected Button to mirror your laptop screen. A long press will take over the display from others.

  • Desktop App Sharing: Select a specific screen or application window to share. Shared windows are marked with a red border. Options include pause/resume or stop sharing.

  • Mobile App Sharing: Tap the share button in the app to mirror your full phone screen. Extra tools include pause, screenshot, and clicker support.

  • Third-Party Apps: Supported apps include AirPlay, Google Cast, and Miracast. Connect your device to the ClickShare Wi-Fi before using these.

If multiple users share at the same time, the system automatically resizes content so everyone’s screen is visible.

Troubleshooting

Q: The Button isn’t connecting. What should I do?

  • Make sure the Button is paired with the Base Unit.

  • If not, pair it by plugging it into the Base Unit’s USB port.

  • Check the LED ring:

    • White = ready,

    • Red = sharing,

    • Blinking = error or connection issue.


Q: My laptop doesn’t recognize the Button.

  • Try another USB port or a USB-C adapter.

  • Ensure antivirus or firewall software isn’t blocking the ClickShare executable.

  • If autorun doesn’t start, open the app manually from the Button drive.


Q: The ClickShare App can’t find the meeting room.

  • Refresh the room list in the app.

  • Enter the Base Unit’s name or IP address manually.

  • Make sure you are connected to the same network as the Base Unit.


Q: I don’t see my screen on the display.

  • Press the share button again.

  • Check that the Base Unit’s LED is red (means it’s streaming).

  • If multiple people are sharing, long-press the button to take over the display.


Q: There’s no sound or video in my conference call.

  • In your conferencing app (Teams, Zoom, etc.), select ClickShare as your microphone, speaker, and camera.

  • Make sure the Base Unit is connected to the room peripherals.


Q: The image on the display is frozen.

  • Pause and resume sharing.

  • If that fails, stop and restart sharing with the Button or App.


Q: How do I reboot the Base Unit?

  • Press and hold the standby button until the LED turns off, then press it again to power back on.

Need Further Help?
Contact Us!