Associa_logo_289_137

Conductor Digital Instructions

Boardroom

RP021131

Crestron AV System User Guide

Video Source Routing – Boardroom Display

This interface allows users to route video sources to the main display in the boardroom. The system is designed for intuitive drag-and-drop operation.

Interface Elements

  • Logo & Room Info: Displays the company logo (Associa) and the current room (Boardroom), along with the date and time.

  • Video Sources: ClickShare, PC, Tuner, HDMI.

  • Display Block: Central “TV” block represents the main boardroom display.

  • Instructional Text: Guides the user to drag and drop the desired source.

  • Volume Control: Slider and mute/unmute buttons.

  • Top-Right Controls: Microphone toggle (red background when muted), Camera icon, Power icon.

How to Route a Video Source

  1. Tap and hold a source icon.

  2. Drag it to the “TV” block.

  3. Release to route the video.

  4. Adjust volume as needed.

2. Set Top Box Controls – Boardroom Display

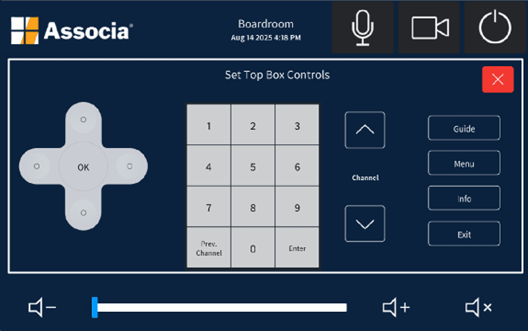
This interface allows users to control a connected set top box directly from the Crestron AV system.

Interface Elements

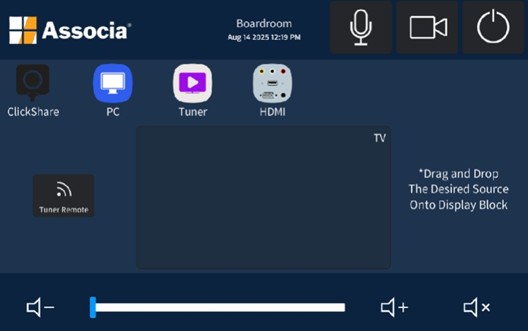
  • Header Info: Logo, Room, Date/Time, Microphone toggle, Camera control, Power options.

  • Control Panel: Directional pad, OK button, Channel up/down, Numeric keypad.

  • Function Buttons: Previous Channel, Enter, Guide, Menu, Info, Exit.

  • Volume Control: Slider and mute/unmute buttons.

3. Hidden Auto Shutdown/Startup Page

This page is accessed by pressing and holding the Associa logo for 5 seconds. It provides options for automatic system startup and shutdown.

Setting Auto Startup and Shutdown Times

Adjust Time Settings

  • Use the “hrs +” / “hrs -” buttons to increase or decrease the hour.

  • Use the “min +” / “min -” buttons to adjust the minutes.

  • Set the desired time for both Auto Startup and Auto Shutdown.

Select Days of the Week

  • Tap the buttons labeled Sun, Mon, Tue, Wed, Thu, Fri, Sat to choose which days the schedule should apply.

  • Selected days will be highlighted or otherwise visually indicated.

Save or Revert Changes

  • Tap Save to apply the new schedule.

  • Tap Revert to discard changes and restore the previous settings.

4. Camera Controls – Boardroom Display

This interface allows users to control the in-room camera for video conferencing or recording.

Accessing the Page

  • Tap the Camera icon in the top-right corner of any screen.

Interface Elements

  • Camera Control Panel: Auto Frame toggle, Zoom In/Out, Directional controls.

  • Presets: Tap to move to a saved position.

  • Saving Presets: Press and hold a preset button for 5 seconds. A green message will confirm the save.

  • Volume Control: Slider and mute/unmute buttons.

Barco User Guide

Button Overview

The ClickShare Conferencing Button is a small USB-C device used to quickly connect to the room system. Once paired with the Base Unit, it lets you share your laptop screen to the meeting room display and access conferencing features.

  • Share Button (center): A short press will start sharing your laptop screen to the display. A long press will take over the display if others are already sharing.

  • Menu Button: Opens or hides the ClickShare App, giving you quick access to extra features.

  • LED Ring: The light around the share button shows the status:

    • White (steady): Ready to use.

    • White (filling): Setting up connection.

    • Red (steady): Actively sharing.

    • Purple/Red (spinning): Conference view with sharing.

    • White or Red (blinking): Error or connection issue.

The Button is designed to make screen sharing simple and give clear visual feedback so you always know what’s happening.

⚠️ Tip: If the Button keeps blinking and never turns white, unplug it and try again.

1 Share button
2 ClickShare menu button
3 USB-C™ connector
4 Strap holes

Base Unit Overview

At the heart of the system is the Base Unit, which connects the Buttons to the meeting room display and any room peripherals (microphones, speakers, cameras, soundbars). When a Button or the app connects, the Base Unit receives the content and sends it to the display.

The Base Unit has a status LED ring that shows its condition:

  • Static white: Awake and ready to use.

  • Static red: Streaming content to the display.

  • Blinking white: Starting up, pairing in progress, or software update.

  • Breathing white: ECO standby mode.

  • Blinking red: An error has occurred.

A single standby button on top of the unit powers the system on or off. If it’s in standby, press the button briefly to start it up. If it’s on, pressing the button puts it back into standby

Connecting to a ClickShare

ClickShare offers several ways to connect your device to the meeting room:

  • Button: Plug the Button into your laptop to connect wirelessly.

  • ClickShare App (desktop or mobile): Connect directly through the app.

  • Button + App (recommended): Combine both for the smoothest experience and full conferencing features.

  • Wired Roomdock: A fallback option using a physical video cable.

Each method establishes a link between your device and the Base Unit, enabling you to share content and use room peripherals. Depending on the method chosen, external internet access may be limited during use.


Connection with a Button

  1. Plug the Button into a USB port on your laptop. Use a USB-C port directly or a dongle if needed.

  2. Wait until the LED ring fills and then turns steady white. This means the Button has successfully connected to the Base Unit.

  3. If your computer does not allow autorun, you may need to open the ClickShare app manually from the Button drive.

  4. Once connected, press the share button to send your screen to the room display.

The Button cannot connect to mobile devices, so it should always be used with a laptop or desktop computer.

Connecting to a ClickShare App

Ways to connect: Button, ClickShare App, Button + Desktop App (recommended), PresentSense, or Wired roomdock.

    • Network note: Depending on method, internet access can be restricted while connected.

    • Using the ClickShare App (desktop or mobile):

      1. Open the app. (On mobile, first join the Base Unit’s Wi-Fi.)

      2. Pick the room from Nearby Rooms or search by name/IP.

      3. Enter the passcode shown on the room display.

      4. The sharing window opens. (Tip: Use “Try Again/Show Passcode Again” if it disappears.)

    • Peripherals at a glance: When room peripherals (mic/cam/speakerphone) are active, their icons turn green on the wallpaper.

Audio settings (read this before your first call):

      • When you plug in a Button, Windows should set ClickShare Speaker = Default device and Room Speakerphone = Default communications device.

      • Content audio plays through Speakers (lip-synced, higher latency).

      • Conference audio (mics/speakerphone) uses the communications device for lowest latency.

      • If sound comes from the laptop instead of the room: in Windows, pick ClickShare Speaker or set it as Default device; set Speakerphone as Default communications device.

ClickShare App Install

Desktop App Installation:

  • Download the app from the Barco website.

  • Run the installer and follow the steps.

  • When the app opens, click “OK, got it” to begin using it.

You can download the ClickShare app here: https://www.barco.com/en/product/clickshare-app

Mobile App Installation:

  • Download the app from your mobile app store.

  • Open the app and grant permissions when prompted.

  • Choose whether to connect immediately to a meeting room (Yes, I am in a ClickShare room) or browse the app first (No, show me the app).

The desktop app unlocks conferencing and other advanced features, while the mobile app allows simple wireless sharing from a smartphone or tablet.

Screen Sharing

ClickShare allows several ways to share content:

  • Button Sharing: Press the share button on the connected Button to mirror your laptop screen. A long press will take over the display from others.

  • Desktop App Sharing: Select a specific screen or application window to share. Shared windows are marked with a red border. Options include pause/resume or stop sharing.

  • Mobile App Sharing: Tap the share button in the app to mirror your full phone screen. Extra tools include pause, screenshot, and clicker support.

  • Third-Party Apps: Supported apps include AirPlay, Google Cast, and Miracast. Connect your device to the ClickShare Wi-Fi before using these.

If multiple users share at the same time, the system automatically resizes content so everyone’s screen is visible.

ClickShare Conference

ClickShare enhances remote and hybrid meetings by connecting laptops to the room’s camera, microphone, and speakers.

Standard Conferencing:

  • Join your remote meeting as usual in Teams, Zoom, Webex, etc.

  • Select ClickShare peripherals as the audio and video devices.

  • Share content locally or remotely during the meeting.

One-Click Join:

  • Sync your calendar in the ClickShare App.

  • Click the calendar icon and select Join for your meeting. This reduces setup to a single step.

Conference View:

  • Lets you show both meeting participants and shared content on the room display.

  • Layouts can be switched at any time.

  • With dual displays, participants appear on one screen and shared content on the other.

This makes ClickShare a full collaboration tool, combining screen sharing and conferencing in one simple system.

Troubleshooting

Q: The Button isn’t connecting. What should I do?

  • Make sure the Button is paired with the Base Unit.

  • If not, pair it by plugging it into the Base Unit’s USB port.

  • Check the LED ring:

    • White = ready,

    • Red = sharing,

    • Blinking = error or connection issue.


Q: My laptop doesn’t recognize the Button.

  • Try another USB port or a USB-C adapter.

  • Ensure antivirus or firewall software isn’t blocking the ClickShare executable.

  • If autorun doesn’t start, open the app manually from the Button drive.


Q: The ClickShare App can’t find the meeting room.

  • Refresh the room list in the app.

  • Enter the Base Unit’s name or IP address manually.

  • Make sure you are connected to the same network as the Base Unit.


Q: I don’t see my screen on the display.

  • Press the share button again.

  • Check that the Base Unit’s LED is red (means it’s streaming).

  • If multiple people are sharing, long-press the button to take over the display.


Q: There’s no sound or video in my conference call.

  • In your conferencing app (Teams, Zoom, etc.), select ClickShare as your microphone, speaker, and camera.

  • Make sure the Base Unit is connected to the room peripherals.


Q: The image on the display is frozen.

  • Pause and resume sharing.

  • If that fails, stop and restart sharing with the Button or App.


Q: How do I reboot the Base Unit?

  • Press and hold the standby button until the LED turns off, then press it again to power back on.

Need Further Help?
Contact Us!