Conductor

Digital Instructions

Index

Room Control Panel

Cable TV Controls: Use the number pad, directional arrows (up, down, left, right), “OK”, “Menu”, “Guide”, “Info”, and “Exit” buttons for cable TV navigation. These controls do not apply to Zoom Room functions.

Volume: Adjusts the volume exclusively for cable TV, not affecting Zoom Room audio settings.

Shades: “All Up” and “All Down” commands fully open or close the shades, respectively. Manual adjustment is possible with the up and down arrows, which can also halt shade movement.

Lighting: Offers the ability to vary light levels from 100% on to completely off.

Sources: Toggle between “Zoom” and “Cable TV” inputs. The display must be set to “Zoom” for Zoom meetings.

Display Power: Activates a popup for turning the display on or off. Typically unnecessary, as the room’s occupancy sensors automatically manage display and lighting activation.

Quick Tips for Zoom Rooms

Section One: Hosting a Meeting from your device – (Teams, Google Meets, etc...)

Step 1: Plug in the provided USB A or USB C and select to “Start” under the BYOD option. If using USB C there is no need for the next step skip to step 3.
Step 2: Once the screen says in BYOD mode plug in the provided HDMI and wait a brief moment for the video to pop up.
Step 3: Now that the video is showing on the screen navigate to the conferencing software of choice on your device and make sure “Echo Cancelling Speakerphone (Biamp)” is selected for speakers and microphone.
Step 4: Make sure the camera selection is set to “Logi Rally Cam”.
Step 5: Once the meeting is concluded simply disconnect the USB and HDMI. The system will automatically return to a normal state after a brief moment.

Section Two: Scheduling and Starting Meetings

Step 1: Schedule meetings using the Zoom web portal or directly from the Zoom Room by selecting “Schedule” on the controller.

Step 2: To start a scheduled meeting, tap “Meetings” and select the meeting you wish to start.

Step 3: For an impromptu meeting, select “New Meeting” to begin instantly.

Section Three: Joining Meetings and Managing Participants

Step 1: Schedule meetings using the Zoom web portal or directly from the Zoom Room by selecting “Schedule” on the controller.

Step 2: To start a scheduled meeting, tap “Meetings” and select the meeting you wish to start.

Step 3: For an impromptu meeting, select “New Meeting” to begin instantly.

Section Four: Sharing Content and Collaboration

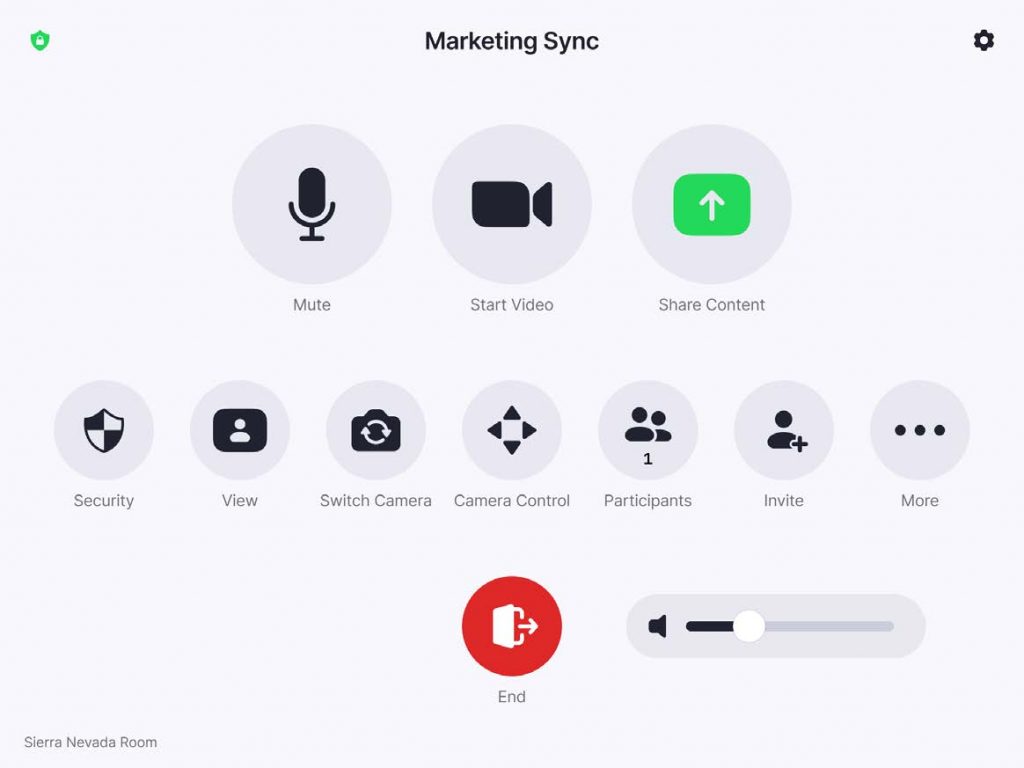
Step 1: Share your screen by selecting “Share Content” and choosing the source you wish to share from.

Step 2: Use annotation tools for collaboration during screen sharing.

Step 3: End the sharing session by tapping “Stop Share.”

To manage the room camera effectively, including pan, tilt, zoom (PTZ) adjustments, engaging auto framing for optimal video composition, and selecting from saved preset positions for quick camera angle changes, simply press the “Camera Control” button. This action enables direct access to a comprehensive set of controls designed to enhance video conferencing by allowing users to tailor the camera’s field of view to fit the meeting’s requirements, ensuring all participants are visible and the focal points are adequately highlighted.

Need Further Help?
Contact Us!