Conductor
Digital Instructions
Education Room
Microsoft Teams Video Conferencing Guide on Windows
Opening Microsoft Teams
- Launch Microsoft Teams by clicking the Microsoft Teams icon in your Start Menu or Taskbar.
- Log in with your work or school account if prompted.
Starting or Joining a Video Conference
- Start a New Meeting:
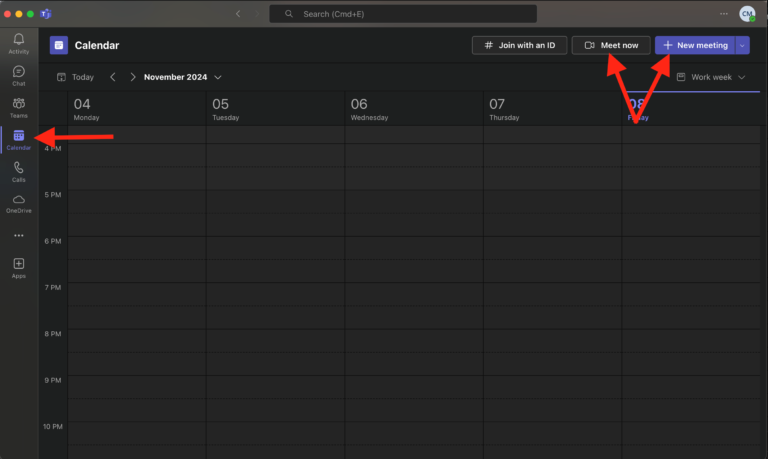
- In Teams, click the Calendar icon from the left sidebar.
- Click New Meeting and enter the meeting details (title, date, time, etc.).
- Click Save, then Join to start the meeting.
- Join an Existing Meeting:
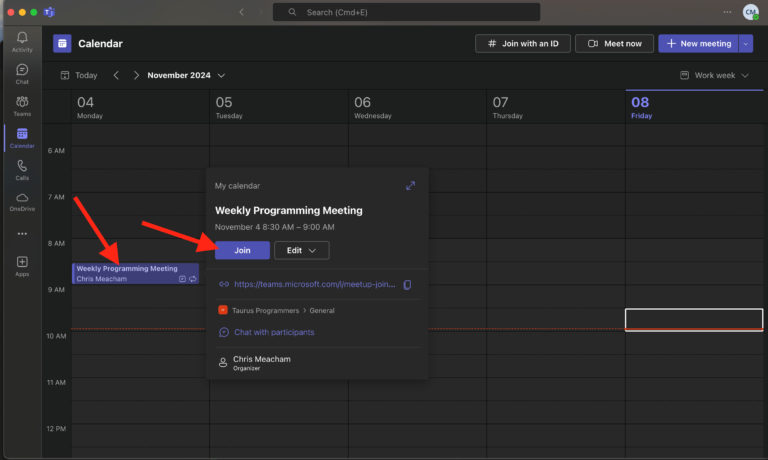
- Go to the Calendar and locate the meeting you want to join.
- Click on the meeting, then select Join.
- Quick Meeting Start (Meet Now):
- Go to Calendar and select Meet Now for an instant meeting.
- Click Join Now to start your meeting immediately.


Selecting Logitech Rally Bar as Audio and Video Devices
- Access Device Settings:
- Before joining a meeting, click on the Settings and devices icon (gear icon) on the pre-join screen.
- Alternatively, after joining, click on the More actions (···) icon in the toolbar, then select Settings > Devices.
- Select Your Camera:
- Under Camera, click the dropdown menu.
- Select Logitech Rally Bar from the list.
- You should see a preview of the camera feed from the Logi Rally Bar once it is selected.
- Choose Your Microphone:
- Under Microphone, select Echo Cancelling Speakerphone (Logitech Rally Bar) from the dropdown list.
- Select Your Speakers:
- Under Speaker, choose
- Echo Cancelling Speakerphone (Logitech Rally Bar) from the dropdown.
- Test Audio and Video (Optional):
- Click Make a test call to ensure everything is working correctly.
- Microsoft Teams will simulate a test call, allowing you to hear and see the setup from the Logi Rally Bar.
Conducting the Video Conference
- Start the Meeting:
- Once you’ve confirmed your settings, click Join Now to enter the meeting.
- Meeting Controls:
- Mute/Unmute: Click the microphone icon to mute or unmute yourself.
- Camera On/Off: Click the camera icon to toggle your video.
- Share Screen: Use the Share content icon to display your screen to others.
- Chat: Click the Chat icon to send messages to other participants.
- Participants: View or invite participants using the Participants icon.
- Ending the Meeting:
- When the meeting is over, click the red Leave button to exit.
Windows Display Settings: Switching Between Extend and Duplicate
Accessing Display Settings
- Right-click on an empty area of your desktop.
- Select Display settings from the context menu.
Changing Between Extend and Duplicate Modes
- In the Display settings window, scroll down to the Multiple displays section.
- Click the dropdown menu under Multiple displays. You’ll see options like:
- Duplicate these displays
- Extend these displays
- Show only on 1
- Show only on 2
- Select Extend these displays if you want each screen to work independently.
- Select Duplicate these displays if you want the same content on both screens.
Applying Changes
- After making your selection, click Apply.
- Windows will briefly adjust your display settings.
- You may see a prompt asking if you want to keep these changes. Select Keep changes to confirm, or Revert to go back to the previous settings.
Quick Shortcut to Change Display Modes
- You can also quickly switch display modes by pressing Windows + P on your keyboard.
- A menu will appear on the right side of your screen with options for PC screen only, Duplicate, Extend, and Second screen only.
- Use the arrow keys or click to select Duplicate or Extend and press Enter to apply.
Button Pad Control Guide
Turning the Display On and Off
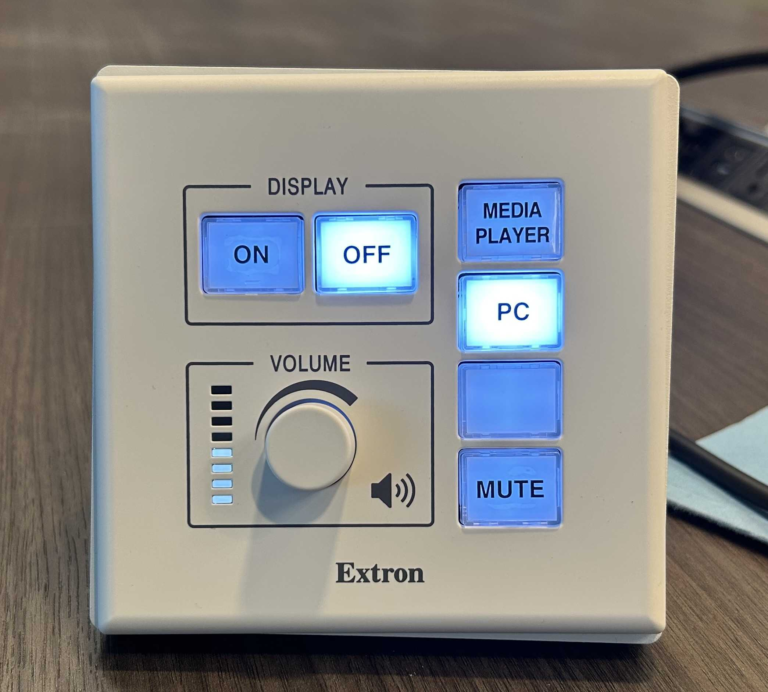
- To turn on the connected display, press the ON button under the DISPLAY section.
- To turn off the display, press the OFF button. The buttons will light up, indicating the current status.
Selecting the Input Source
- To display content from a Media Player, press the MEDIA PLAYER button. Once selected, media can be shared to this input via the ClickShare Button.
- To display content from the PC (connected computer via the USB-C Dock), press the PC button.
- Only one input source can be active at a time, and the selected source button will remain lit.
Adjusting Volume
- Use the VOLUME dial to adjust the audio level.
- Turn the dial clockwise to increase the volume and counterclockwise to decrease it.
- The light indicator next to the dial will show the current volume level.
Muting Audio
- Press the MUTE button to mute the audio output. The MUTE button will light up to indicate that the audio is muted.
- Press the button again to unmute.

Barco ClickShare Button: Quick Start Guide
Connect the Button
- Plug the ClickShare Button into your laptop. It will connect automatically to the room system.
Ready to Share
- When the button lights up solid white, it’s ready to share.
- Press the button once to share your screen. The button will turn red to indicate sharing is active.
Dual Sharing
- Up to two people can share their screens simultaneously. ClickShare will optimize the screen layout for the best visibility.
Take Over the Full Screen
- Long-press the button if you want to take over the entire screen for your content.
Access Advanced Features
- Press the small quick button on the ClickShare device to open the app and access additional features.
End Sharing
- To stop sharing, press the button once. To disconnect entirely, unplug the button from your laptop.


