BSW Logo

Conductor Digital Instructions

Omega Room

RP021918

Cisco Microsoft Teams Room

Home Screen

This is the main screen the Microsoft Teams Room will display while not in use. From here you can access many of the room’s features.

  1. Join a Scheduled Meeting
  2. Start a Meeting
  3. Make a Call
  4. Share content
  5. Room Controls
  6. Join with an ID
  7. More Options
  8. Join Meeting with QR Code

Join a Scheduled Meeting from the Touch Panel

When meetings are scheduled for the room, they will be listed on the home screen.

To join your scheduled meeting simply tap the join button.

You can also join the meeting whilst in the room from your laptop or mobile phone if you want to present or access meeting chat.

Using the QR Code to Join or Share in Microsoft Teams Rooms

Microsoft Teams Rooms on both Windows and Android support a fast, wireless way to bring your meeting to the room using the QR code displayed on the home screen. This eliminates the need for Bluetooth pairing or plugging in your device, making it easier to connect on the fly.

The QR code is always visible on the room’s main screen by default and refreshes every 60 seconds to ensure security. Once scanned with your phone’s camera, you’ll be prompted to take one of the following actions:

  • Join a meeting currently in progress or one scheduled to begin within 10 minutes

  • Start a new ad-hoc meeting directly from your device

  • Cast content from your mobile device to the front-of-room display

If the Microsoft Teams mobile app isn’t installed, you’ll be prompted to download it after scanning the code.

This functionality is available on all Teams Rooms licenses and works across both Windows and Android-based room systems. It also supports external meetings when your organization’s Teams policies allow for it.

Typical Use Cases

  • Walking into a room and wanting to start or join a meeting without connecting a laptop

  • Quickly sharing slides, media, or other content from your phone

  • Using the room’s displays without formally scheduling a meeting

How to Join a Webex Meeting

1. Swipe from the Right

Swipe in from the right edge of the screen to open the Control Panel.

2. Tap the Webex Icon

In the Control Panel, tap the Webex icon.

3. Enter Meeting Info
  • Type the Webex meeting number from your invite

  • Or search by the host’s name or email for a Personal Room meeting

4. Tap Join

Tap Join to enter the Webex meeting.

Start a new Ad-Hoc Meeting

When you want to use the system for a new, unscheduled meeting, the “Meet” button allows you to create a new Teams meeting from the Microsoft Teams Room system and invite people to it by searching a name or number in the text field.

Make a Call

If your organization has telephony set up for the meeting room, pressing the “Call” button will bring up a dial pad.

Simply dial the number and press “Call”.

You can also dial in participants to a meeting once it is in progress.

Camera Controls

Accessing Camera Settings

  • Swipe right on the home screen or Room Navigator to open the Control Panel.

  • Select Camera at the top.

Save a Camera Preset

  1. Swipe right → CameraManual.

  2. Adjust pan, tilt, and zoom.

  3. Tap Save Camera View, name it, and save.

  4. Find saved presets under Saved Camera Views.

  5. To edit or delete, select the preset and update or remove.

Adjust Self-View

  • Access: Swipe right → Selfview.

  • Visibility Options: Hide, Show in Call, or Always Show.

  • Fullscreen: Tap Fullscreen to expand, then tap again to exit.

  • Move Self-View: In a call, press and drag to reposition — it will snap to preset positions.

Sharing Content in This Room

You can share content to the room displays at any time – whether you’re in a meeting or not.

Tap the “Share” button on the Crestron touch panel.

You’ll be prompted to choose how to share your content:

  • Wirelessly – Share from your laptop or personal device using the Microsoft Teams desktop application or by scanning the QR code shown on the touch panel and flat panel screens.

  • Wired (Room PC or Wallplate) – This room also includes wired connection points at the front wallplate. You can plug in using USB-C or HDMI.
    Note: Input names may vary depending on your room setup.

If a colored frame appears around your content, it means your screen is currently being shared with remote participants.

Join with Meeting ID

Every teams Meeting has a unique 12-digit ID.

Another way to join a meeting from the room is to add the meeting ID.

You will find the meeting ID and passcode in your Outlook Calendar invite.

Invite and join the Room to a Meeting

If you have a meeting set up in your calendar, or on your device, but the room hasn’t been invited already, you can add the room from your laptop or mobile device.

More Options

If you press the “More” button a new page will open which lets you restart the device, access settings and report a fault.

Joining your Device to the Meeting

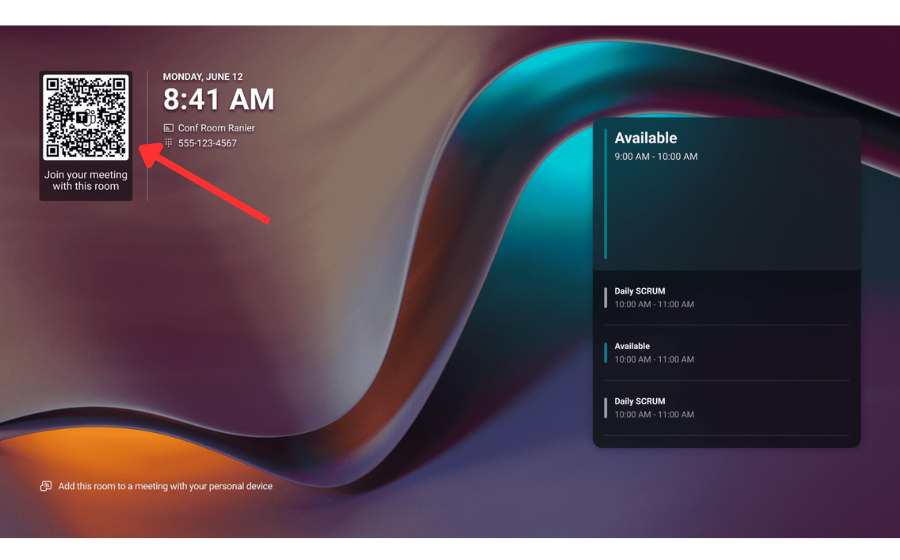
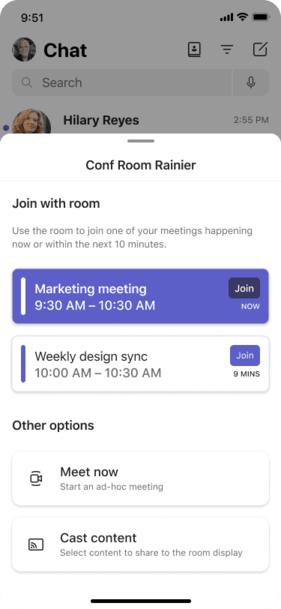
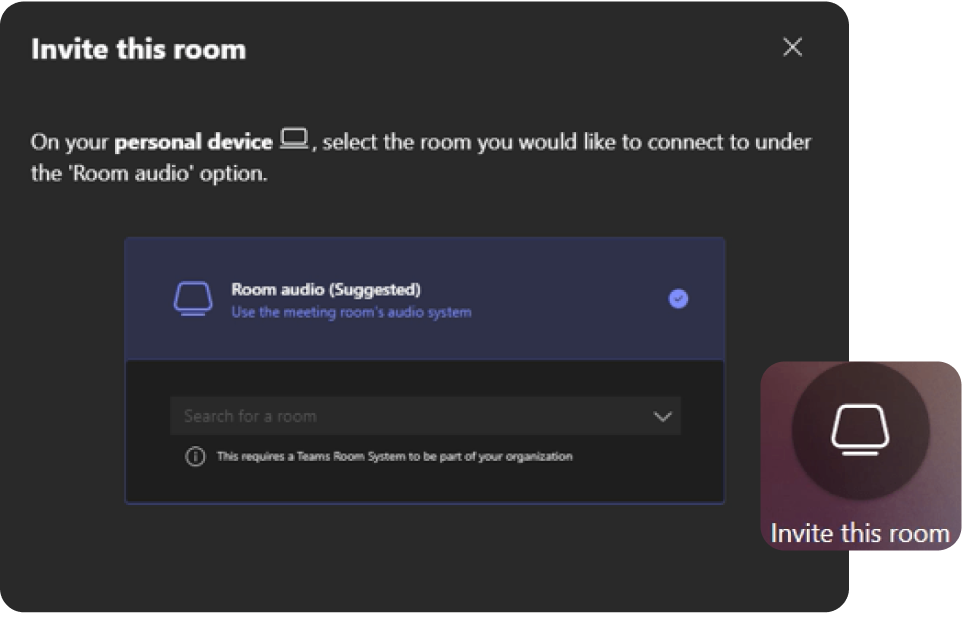
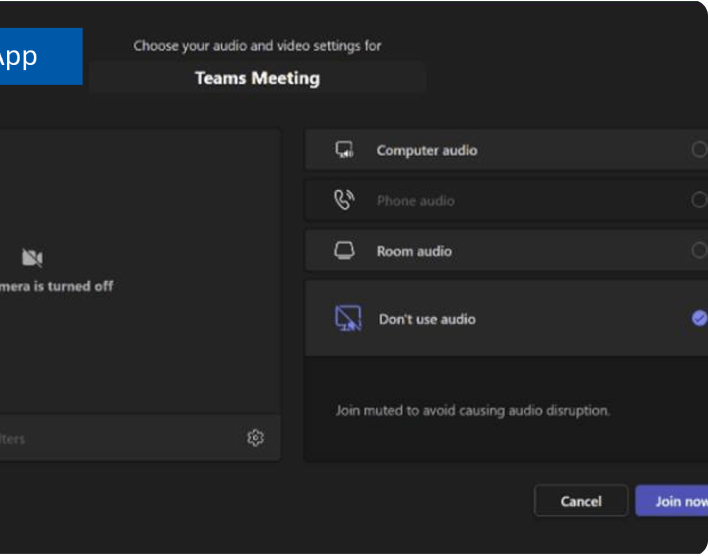
You might also want to join the meeting from your own device to share content or view participants on your device while content is shown on the room display.

When joining from your device, select Don’t Use Audio so you join completely muted with sound off.

If you need to use the room’s speakers and microphones, select Room Audio instead.

Important: If you are connected to the meeting from both the room system and your personal device, all audio on your personal device must be fully muted — both microphone and speakers — to prevent echo or feedback.

Meeting Controls

Here’s a quick overview of the controls available when you are in a meeting.

  1. View Options
  2. Raise your hand
  3. Reactions
  4. Options
  5. Volume control
  6. Camera on/off
7. Mute on/off
8. Share Content
9. End Call
10. Invite someone
11. Participants (tap to manage)
12. Manage Participants
13. Participant controls (per person)

Changing the Layout

You can select from multiple layouts in your meeting.

The available layouts will be selectable depending on your room’s licensing, display format, number of attendees and whether content is being presented.

You can also switch on meeting chat to see messages on the display.

To customize your Microsoft Teams Room experience on a Cisco device, simply swipe from the right edge of the screen.

This brings up the Control Panel, giving you quick access to key settings and tools — whether you’re in a meeting or not.

  • Available on: Cisco Desk, Board, and Room Navigator devices

  • Works during and outside of active meetings

  • Helps you manage video, audio, content sharing, and more with ease

Camera

Manually control camera positioning or switch camera modes to fit your meeting needs.

Selfview

Turn your selfview on or off during a call. It always appears at the top of the panel when the camera is active.

Background

Choose a virtual background (primarily supported on Desk devices) for a more professional look.

Fullscreen

Enlarge your selfview to full screen. To exit, swipe right and tap Fullscreen again.

Share Options

Select which device or content source you want to share from. Works both during and outside of a call.

Call

Place SIP-based calls directly from the room system when using Microsoft Teams Rooms mode.

Microphone

Enable noise removal or optimize your mic for better voice pickup.

Webex

Join a Webex meeting using Cisco devices without leaving Teams Room mode.

Zoom

Launch and join Zoom meetings directly from the control panel.

Standby

Put the device into standby mode when not in use to save power and protect privacy.

Auto Brightness

Adjust screen brightness manually or let the system automatically optimize it.

Speakers

Change the speaker volume. This can also be managed through the “More” button on the home screen.

Device Info

Access network settings, diagnostics, Bluetooth, time zone, language, and Teams admin settings (password protected).

Troubleshooting

  • Display not showing an image?
    • Ensure the display is on. This can be confirmed by using it’s IR remote
    • Also make sure the display is on the correct input. This can be tricky as to exactly which input is correct so please don’t hesitate to call us!
  • Content not showing up when wireless casting?
    • Ensure you are connected to a network (Wi-Fi or wired).
    • Ensure you have followed the proper steps for your personal device or laptop (see Sharing Content sections).
  • Don’t see my meeting?
    • There may have been a conflict with the room receiving the invite. You can try to forward the invite to the room and wait a few minutes for it to show up or type in your meeting ID (see Join with Meeting ID section).
  • The volume of the speakers is too low / high.
    • Along the bottom the volume control will allow you to correct this.
  • They can’t hear me.
    • Make sure your microphones aren’t muted. This can be done by ensuing the icon is active on the touch panel or by ensuing your microphones are illuminated green.
  • I can’t see the other participant in the call, but they can see me.
    • If their image is completely blank / black, there could be something wrong with their camera. Ask them to disconnect and reconnect to the call to see if it corrects the issue.
  • Any other issue…. PLEASE call or email us! We love to help!

Barco User Guide

Button Overview

The ClickShare Conferencing Button is a small USB-C device used to quickly connect to the room system. Once paired with the Base Unit, it lets you share your laptop screen to the meeting room display and access conferencing features.

  • Share Button (center): A short press will start sharing your laptop screen to the display. A long press will take over the display if others are already sharing.

  • Menu Button: Opens or hides the ClickShare App, giving you quick access to extra features.

  • LED Ring: The light around the share button shows the status:

    • White (steady): Ready to use.

    • White (filling): Setting up connection.

    • Red (steady): Actively sharing.

    • Purple/Red (spinning): Conference view with sharing.

    • White or Red (blinking): Error or connection issue.

The Button is designed to make screen sharing simple and give clear visual feedback so you always know what’s happening.

⚠️ Tip: If the Button keeps blinking and never turns white, unplug it and try again.

1 Share button
2 ClickShare menu button
3 USB-C™ connector
4 Strap holes

Base Unit Overview

At the heart of the system is the Base Unit, which connects the Buttons to the meeting room display and any room peripherals (microphones, speakers, cameras, soundbars). When a Button or the app connects, the Base Unit receives the content and sends it to the display.

The Base Unit has a status LED ring that shows its condition:

  • Static white: Awake and ready to use.

  • Static red: Streaming content to the display.

  • Blinking white: Starting up, pairing in progress, or software update.

  • Breathing white: ECO standby mode.

  • Blinking red: An error has occurred.

A single standby button on top of the unit powers the system on or off. If it’s in standby, press the button briefly to start it up. If it’s on, pressing the button puts it back into standby

Connecting to a ClickShare

ClickShare offers several ways to connect your device to the meeting room:

  • Button: Plug the Button into your laptop to connect wirelessly.

  • ClickShare App (desktop or mobile): Connect directly through the app.

  • Button + App (recommended): Combine both for the smoothest experience and full conferencing features.

  • Wired Roomdock: A fallback option using a physical video cable.

Each method establishes a link between your device and the Base Unit, enabling you to share content and use room peripherals. Depending on the method chosen, external internet access may be limited during use.

Connection with a Button

  1. Plug the Button into a USB port on your laptop. Use a USB-C port directly or a dongle if needed.

  2. Wait until the LED ring fills and then turns steady white. This means the Button has successfully connected to the Base Unit.

  3. If your computer does not allow autorun, you may need to open the ClickShare app manually from the Button drive.

  4. Once connected, press the share button to send your screen to the room display.

The Button cannot connect to mobile devices, so it should always be used with a laptop or desktop computer.

Connecting to a ClickShare App

Ways to connect: ButtonClickShare AppButton + Desktop App (recommended)PresentSense, or Wired roomdock.

      • Network note: Depending on method, internet access can be restricted while connected.

      • Using the ClickShare App (desktop or mobile):

        1. Open the app. (On mobile, first join the Base Unit’s Wi-Fi.)

        2. Pick the room from Nearby Rooms or search by name/IP.

        3. Enter the passcode shown on the room display.

        4. The sharing window opens. (Tip: Use “Try Again/Show Passcode Again” if it disappears.)

      • Peripherals at a glance: When room peripherals (mic/cam/speakerphone) are active, their icons turn green on the wallpaper.

Audio settings (read this before your first call):

  • When you plug in a Button, Windows should set ClickShare Speaker = Default device and Room Speakerphone = Default communications device.
  • Content audio plays through Speakers (lip-synced, higher latency).
  • Conference audio (mics/speakerphone) uses the communications device for lowest latency.
  • If sound comes from the laptop instead of the room: in Windows, pick ClickShare Speaker or set it as Default device; set Speakerphone as Default communications device.

Connecting to a ClickShare App

Desktop App Installation:

  • Download the app from the Barco website.

  • Run the installer and follow the steps.

  • When the app opens, click “OK, got it” to begin using it.

You can download the ClickShare app here: https://www.barco.com/en/product/clickshare-app

Mobile App Installation:

  • Download the app from your mobile app store.

  • Open the app and grant permissions when prompted.

  • Choose whether to connect immediately to a meeting room (Yes, I am in a ClickShare room) or browse the app first (No, show me the app).

The desktop app unlocks conferencing and other advanced features, while the mobile app allows simple wireless sharing from a smartphone or tablet.

Screen Sharing

ClickShare allows several ways to share content:

  • Button Sharing: Press the share button on the connected Button to mirror your laptop screen. A long press will take over the display from others.

  • Desktop App Sharing: Select a specific screen or application window to share. Shared windows are marked with a red border. Options include pause/resume or stop sharing.

  • Mobile App Sharing: Tap the share button in the app to mirror your full phone screen. Extra tools include pause, screenshot, and clicker support.

  • Third-Party Apps: Supported apps include AirPlay, Google Cast, and Miracast. Connect your device to the ClickShare Wi-Fi before using these.

If multiple users share at the same time, the system automatically resizes content so everyone’s screen is visible.

ClickShare Conference

ClickShare enhances remote and hybrid meetings by connecting laptops to the room’s camera, microphone, and speakers.

Standard Conferencing:

  • Join your remote meeting as usual in Teams, Zoom, Webex, etc.

  • Select ClickShare peripherals as the audio and video devices.

  • Share content locally or remotely during the meeting.

One-Click Join:

  • Sync your calendar in the ClickShare App.

  • Click the calendar icon and select Join for your meeting. This reduces setup to a single step.

Conference View:

  • Lets you show both meeting participants and shared content on the room display.

  • Layouts can be switched at any time.

  • With dual displays, participants appear on one screen and shared content on the other.

This makes ClickShare a full collaboration tool, combining screen sharing and conferencing in one simple system.

Troubleshooting

Q: The Button isn’t connecting. What should I do?

  • Make sure the Button is paired with the Base Unit.

  • If not, pair it by plugging it into the Base Unit’s USB port.

  • Check the LED ring:

    • White = ready,

    • Red = sharing,

    • Blinking = error or connection issue.


Q: My laptop doesn’t recognize the Button.

  • Try another USB port or a USB-C adapter.

  • Ensure antivirus or firewall software isn’t blocking the ClickShare executable.

  • If autorun doesn’t start, open the app manually from the Button drive.


Q: The ClickShare App can’t find the meeting room.

  • Refresh the room list in the app.

  • Enter the Base Unit’s name or IP address manually.

  • Make sure you are connected to the same network as the Base Unit.


Q: I don’t see my screen on the display.

  • Press the share button again.

  • Check that the Base Unit’s LED is red (means it’s streaming).

  • If multiple people are sharing, long-press the button to take over the display.


Q: There’s no sound or video in my conference call.

  • In your conferencing app (Teams, Zoom, etc.), select ClickShare as your microphone, speaker, and camera.

  • Make sure the Base Unit is connected to the room peripherals.


Q: The image on the display is frozen.

  • Pause and resume sharing.

  • If that fails, stop and restart sharing with the Button or App.


Q: How do I reboot the Base Unit?

  • Press and hold the standby button until the LED turns off, then press it again to power back on.


Need Further Help?
Contact Us!